How to Practice Gun Mount for Better Wingshooting
A correct gun mount is the bedrock of all good techniques in the Churchill Method of wingshooting
Few things are more satisfying than a perfect shot. The skill required is a product of sound basic techniques, perfect practice and smoothly honed reactions, but these don’t come overnight. First, you must know what it is you need to practice; only then can you do something about it. In shooting, as in other endeavours, ignorance prevents progress.
As a professional coach over the last 30 plus years, teaching the Churchill method, I have regularly seen shooters struggling with the same basic problems – stance, gun mount, eye dominance or gun fit. Sometimes they will need to correct just one of these; at other times, a combination.
Let’s look at the most important of all the “basics” that needs to be perfect: the ‘Gun Mount.’ This is the bedrock of all good shooting – get it wrong and you’ll never produce your best, no matter how many cartridges you put through the barrels.
I was told by that great coach Chris Craddock, “A miss-mount is a missed shot.” This applies without exception to both the “gun up” and the “gun down” shooter. Invariably, we all start out believing that the first priority is to place the gun in the shoulder pocket and that this will naturally line up the rib of the barrels with our eye. Novice shooters instinctively mount the gun using just the back hand to lift the stock to the shoulder with a pivotal movement. This, however, creates a seesaw action at the end of the barrel and encourages dropping the head down to the stock to get the eye (the back site) in the right place to see the target.
The prime objective of a gun mount is to bring the gun up to the dominant eye first, placing the comb under the cheekbone (your kinematic buttress). The secondary objective is to place the stock butt plate back into the shoulder pocket, which is no more than a platform to keep the gun in place.
This is normally the reverse of what our brain tells us is the right thing to do. Let’s not forget we are shooting a shotgun which we just have to point, not a rifle that has to be aimed!
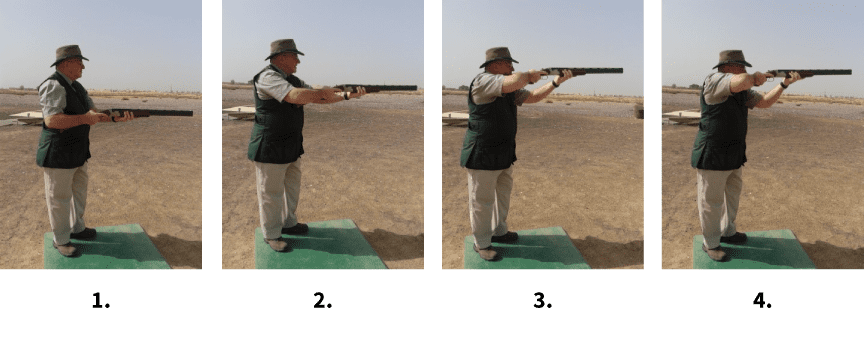
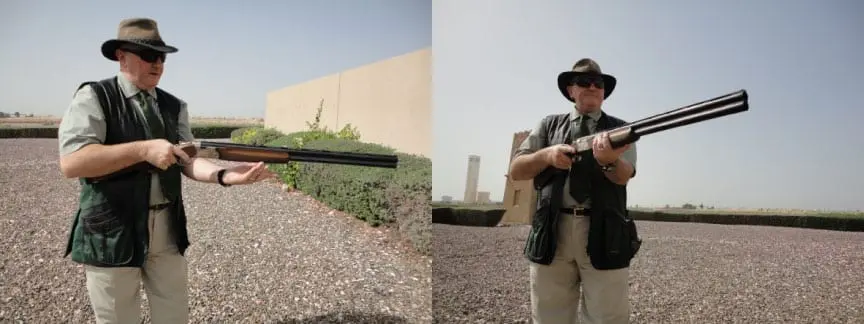
The most efficient, effective and consistent way to bring the gun up to the eye (the back sight) is to use both arms in unison lifting the gun with a parallel action. To practice this properly and to overcome the natural temptation to lift the gun with the back hand only, you must begin with the gun parallel to the floor, with the toe of the stock, your back hand elbow and the top of your hip all in a line forming the starting point. Then push the gun away from your body (to do it right and it feels as if you have to exaggerate this movement) as you start to raise your arms — keeping the head still as the stock comes up in line with the cheek. Draw the gun back (creating a reversing piston action) — this should then bring the gun up to the face first and then back into the shoulder pocket second.
If you raise your trigger hand elbow up to 90 degrees as you mount the gun, you will create the maximum width shoulder pocket for the stock to sit in. The lower your elbow is, the smaller the area becomes and this increases the instability of the gun, creating the opportunity for bruising to your upper arm.
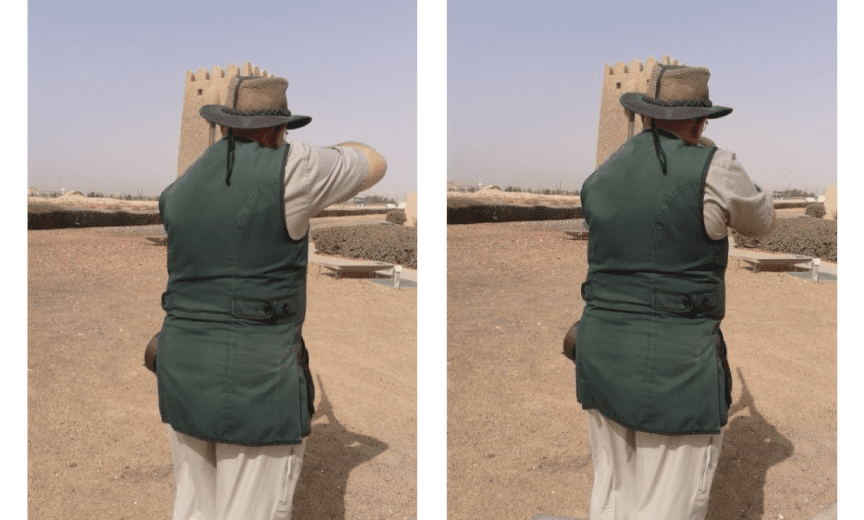
Bear in mind, the dismount is just as important as the mount — and it must be the same movement using both arms together but in reverse. It’s imperative to not allow the back hand to drop the gun down first. Return the toe of the stock back to your start line and finish the movement with the barrels parallel to the floor.
Practicing the mount in this way is not only bringing the gun up to the eye accurately and efficiently, it is also training your front hand to be the motive force in pointing the barrels instinctively to where your eye is looking.
You should practice your gun mount for a minimum of ten minutes, three times a week or more. It takes approximately 2,500 repetitive movements before it becomes lodged in your muscle memory and you can carry out the action without conscious thought (a kinesthetic movement).
The best way to practice this routine (with an empty and safe gun, of course!) is to stand in front of a full length mirror. The stance for a right-hander should be with the front (left) foot pointing at 12 o’clock and the back foot (right) at 2 o’clock; for left handers it’s 12 o’clock and 10 o’clock. Feet should be shoulder width apart and, most importantly, the front leg knee should be relaxed and bent. This allows your weight to naturally come forward. Your shoulders should be as square as comfortable facing front. This stops the front hand shoulder going forward and incorrectly mounting the gun across the upper body, like a rifle stance.
Close the gun with the barrels parallel to the floor. You will now see that the gun is not actually pointing straight ahead but naturally across your body. Realign the barrels till they point straight ahead (towards your dominant eye) in the mirror. This will feel odd and seem like you’re pointing off to one side — but you will see that’s not the case. If you don’t already do this, extend your front hand forefinger so it’s directly under the fore end, not next to it, so it’s now in line with the barrels above. Remember, shooting a shotgun is just a pointing game, so let your pointing finger do what it needs to and point the barrels at what your eye is looking at (the target).
This is an extract from Robert Churchill’s book on “Game Shooting.” It shows his method of gun mounting which proved so devastatingly effective on the grouse moors, especially for many members of the British Royal family and aristocracy.
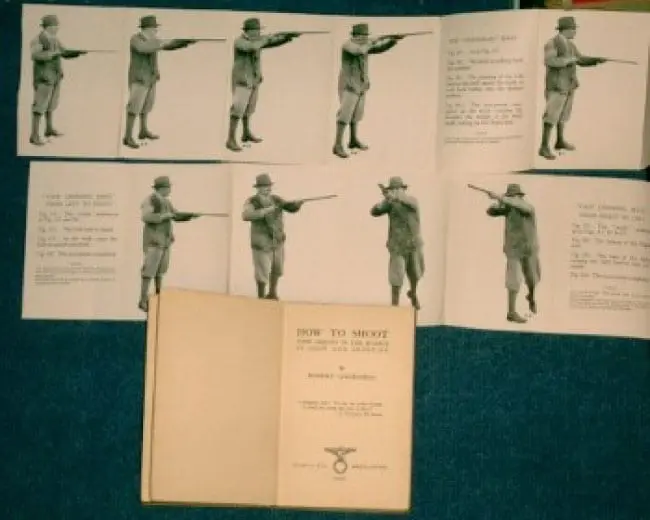
My own line of coaching mentors is a direct decent from Churchill, via those other renowned instructors, Chris Craddock and Roger Silcox. That is why I advocate his style of shooting.
Now keeping the head perfectly still, start raising the gun up to your eye using both hands together with the reversing piston action (you will see in the mirror if you are dropping or lifting your head, which you must not do!), bringing it to your face first then shoulder second. While the gun is mounted, shut your opposite eye; by doing this, you will see if your dominant eye is placed in line with the rib and thus giving the correct sight picture at the end of the barrel. Do three mounts and correct dismounts then break the gun and rest your arms, wait for few seconds, then another set of three. You can carry on, but don’t go beyond a point where your arms are tiring and your muscles are stressed.
To add variation and develop your natural pointing ability, now do some sets of gun mounts using the wall and ceiling corners as a target contact point. Just raise the muzzles up slightly and start the mount on a parallel diagonal approach to the target point, placing the gun in your face and in line with your eye at the exact same time (not before) as the barrels make contact with the corner.
So now, not only are you practicing the perfect mount, you are now able to bring the gun up to your eye with the barrels making accurate contact with whatever you point at — efficiently, consistently and instinctively without having to think about it (a kinesthetic movement).
Practicing your gun mount with these routine exercises will create muscle memory, improve your hand-and-eye co-ordination and enable you to get the eye, muzzle, target alignment right every time.
Regrettably, in shotgun shooting as in other hand-and-eye co-ordinated sports there is no such thing as a “Quick Fix.” New techniques must be practiced before they become effective, as you can’t train for and play the game at the same time. When making the effort to improve our skills, patience is a virtue and sometimes we have to accept that when trying something new, we get a little worse before we get better. This is because when in training we are consciously thinking about what we are trying to achieve. It’s only after we have spent time practicing and honing these new skills, will our overall performance improve and keep on improving as we develop confidence in our abilities and experience increasing successes.
Now I can already hear numerous upland hunters saying, “Well, how does this help me when I have to carry the gun in the field?” since some of you no doubt carry it angled across your body at a “Port Arms” position.
You’ll find this gun mount exercise and method applies to all shotgun shooters. Be it for hunting, driven shooting trap, skeet or sporting clays, you must learn to mount your gun just the same as naturally pointing your finger.
There is in fact a particular method for carrying a gun in the field when shooting walked up birds. This we shall look at in the next article.